Manage k8s Secrets Using HashiCorp Vault: With Practical Examples
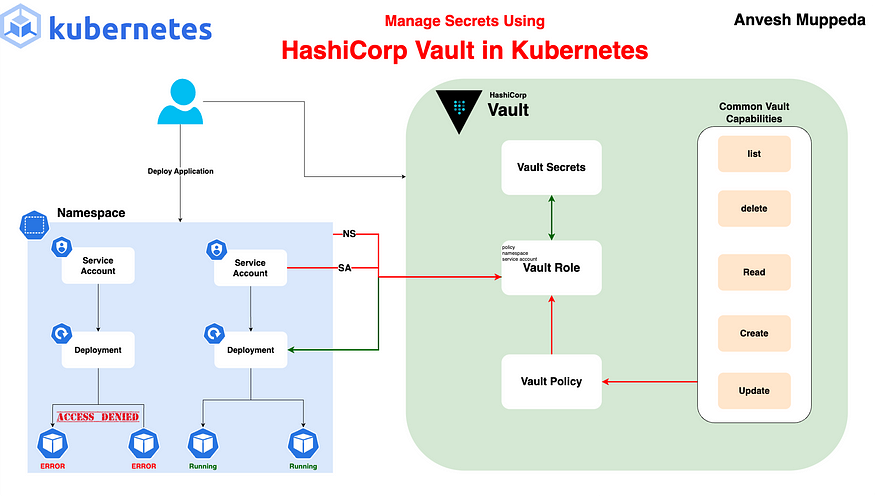 Manage Secrets Using HashiCorp Vault in Kubernetes by Anvesh Muppeda
Inthe world of Kubernetes, managing secrets such as API keys, passwords, and other sensitive information is a critical task. Kubernetes has its own built-in secrets management mechanism, but it has certain limitations that might not meet the security requirements of all organizations. For instance, Kubernetes secrets are stored in etcd, which, although encrypted at rest, might not provide the level of security and access control needed for highly sensitive information.
This is where HashiCorp Vault comes into play. Vault is a tool designed to securely store and manage sensitive information. It provides robust mechanisms for dynamic secrets, encryption as a service, and access control, making it an ideal solution for managing secrets in a Kubernetes environment.
In this tutorial, we will walk through the steps to install and configure Vault in a Kubernetes cluster using Helm and deploy a pod and access the secrets from Vault. By the end of this guide, you’ll have a working Vault setup in your Kubernetes cluster, ready to manage your application’s secrets securely.
Prerequisites
Before you begin, ensure you have the following:
- A Kubernetes cluster up and running.
- kubectl configured to interact with your cluster.
- Helm installed on your local machine
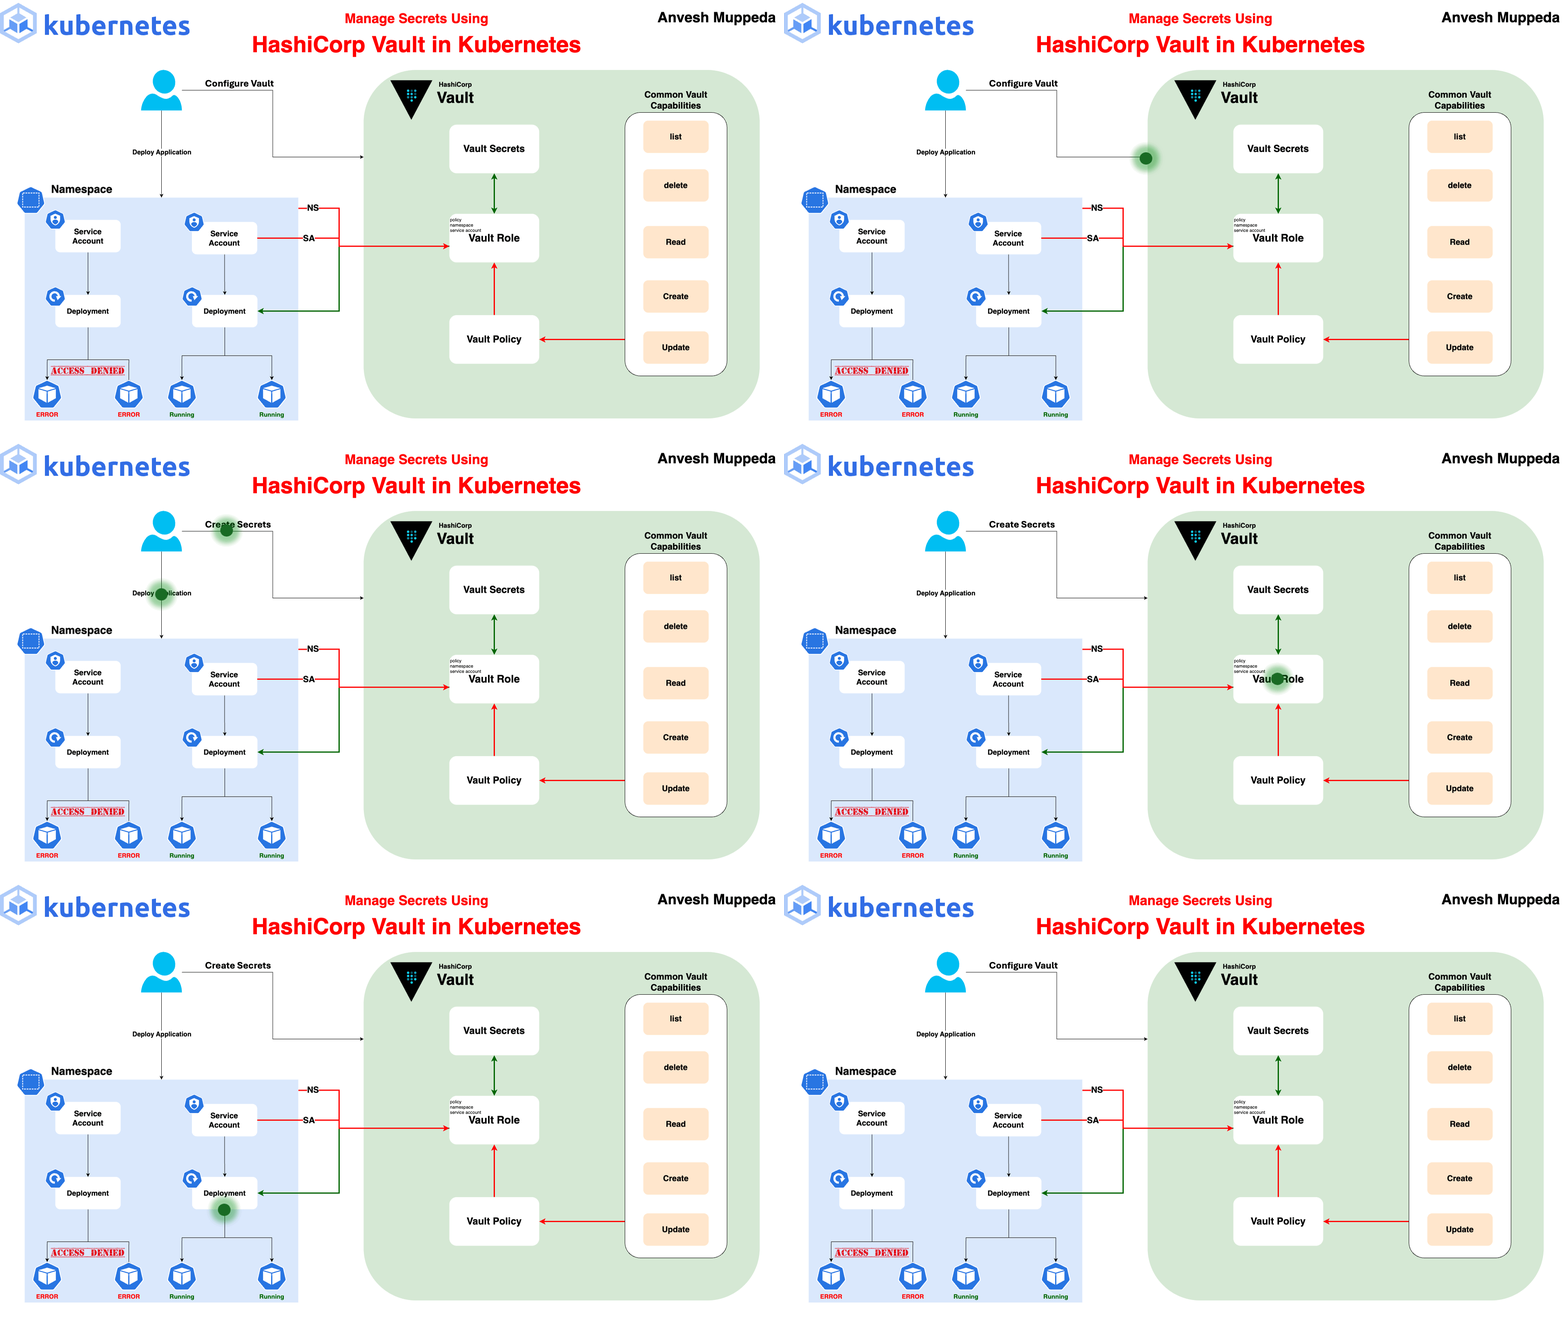 Manage secrets using hashicorp vault in kubernetes by Anvesh Muppeda
Create Vault Namespace
First, we need to create a separate namespace for Vault. This helps in managing resources specific to Vault independently.
$ kubectl create ns vault
Install Vault
We will install the latest version of Vault using the Helm chart provided by HashiCorp. There are two methods to do this: 1. directly running the Helm install command using the HashiCorp Helm repository or 2. downloading the Helm chart and installing it locally.
1. Add the HashiCorp Helm Repository
Add the HashiCorp Helm repository to your Helm configuration.
helm repo add hashicorp https://helm.releases.hashicorp.com
2. Installation Methods
1. Directly Running Helm Install
You can directly install Vault using the Helm chart from the HashiCorp repository with the following command:
helm install vault hashicorp/vault \
       --set='server.dev.enabled=true' \
       --set='ui.enabled=true' \
       --set='ui.serviceType=LoadBalancer' \
       --namespace vault
2. By Downloading the Helm Chart and Installing
Alternatively, you can download the Helm chart and install it locally:
# Download the Helm chart
helm pull hashicorp/vault --untar

# Install Vault using the downloaded chart
helm install vault \
       --set='server.dev.enabled=true' \
       --set='ui.enabled=true' \
       --set='ui.serviceType=LoadBalancer' \
       --namespace vault \
       ./vault-chart
Using these settings, we are installing Vault in development mode with the UI enabled and exposed via a LoadBalancer service to access it externally. This setup is ideal for testing and development purposes.
Running Vault in “dev” mode. This requires no further setup, no state management, and no initialization. This is useful for experimenting with Vault without needing to unseal, store keys, et. al. All data is lost on restart — do not use dev mode for anything other than experimenting. See https://developer.hashicorp.com/vault/docs/concepts/dev-server to know more
Output:
$ kubectl get all -n vault
NAME                                        READY   STATUS    RESTARTS   AGE
pod/vault-0                                 1/1     Running   0          2m39s
pod/vault-agent-injector-8497dd4457-8jgcm   1/1     Running   0          2m39s

NAME                               TYPE           CLUSTER-IP       EXTERNAL-IP    PORT(S)             AGE
service/vault                      ClusterIP      10.245.225.169   <none>         8200/TCP,8201/TCP   2m40s
service/vault-agent-injector-svc   ClusterIP      10.245.32.56     <none>         443/TCP             2m40s
service/vault-internal             ClusterIP      None             <none>         8200/TCP,8201/TCP   2m40s
service/vault-ui                   LoadBalancer   10.245.103.246   24.132.59.59   8200:31764/TCP      2m40s

NAME                                   READY   UP-TO-DATE   AVAILABLE   AGE
deployment.apps/vault-agent-injector   1/1     1            1           2m40s

NAME                                              DESIRED   CURRENT   READY   AGE
replicaset.apps/vault-agent-injector-8497dd4457   1         1         1       2m40s

NAME                     READY   AGE
statefulset.apps/vault   1/1     2m40s
Configure Vault
In this step, we will set up Vault policies and authentication methods to securely manage and access secrets within the Kubernetes cluster. This configuration ensures that only authorized applications can retrieve sensitive data from Vault.
1. Connect to the Vault Pod
After the installation, connect to the Vault pod to perform initial configuration:
kubectl exec -it vault-0 -- /bin/sh
2. Create and Apply a Policy
Next, we’ll create a policy that allows reading secrets. This policy will be attached to a role, which can be used to grant access to specific Kubernetes service accounts.
Create the policy file:
cat <<EOF > /home/vault/read-policy.hcl
path "secret*" {
  capabilities = ["read"]
}
EOF
Apply the policy:
# SYNTAX
$ vault policy write <policy-name> /path/to/policy.hcl

# EXAMPLE
$ vault policy write read-policy /home/vault/read-policy.hcl
3. Enable Kubernetes Authentication
Enable the Kubernetes authentication method in Vault:
vault auth enable kubernetes
4. Configure Kubernetes Authentication
Configure Vault to communicate with the Kubernetes API server:
vault write auth/kubernetes/config \
   token_reviewer_jwt="$(cat /var/run/secrets/kubernetes.io/serviceaccount/token)" \
   kubernetes_host=https://${KUBERNETES_PORT_443_TCP_ADDR}:443 \
   kubernetes_ca_cert=@/var/run/secrets/kubernetes.io/serviceaccount/ca.crt
5. Create a Role
Create a role(vault-role) that binds the above policy to a Kubernetes service account(vault-serviceaccount) in a specific namespace. This allows the service account to access secrets stored in Vault:
vault write auth/kubernetes/role/vault-role \
   bound_service_account_names=vault-serviceaccount \
   bound_service_account_namespaces=vault \
   policies=read-policy \
   ttl=1h
Here we can pass multiple service accounts and namespaces:
vault write auth/kubernetes/role/<my-role> \
   bound_service_account_names=sa1, sa2 \
   bound_service_account_namespaces=namespace1, namespace2 \
   policies=<policy-name> \
   ttl=1h
Create Secrets
Now, let’s create some secrets in Vault:
We can create the secrets in two ways:
- Using the Vault CLI
- Using the Vault UI
1. Using the Vault CLI
Create secret using the below command
$ vault kv put secret/login pattoken=ytbuytbytbf765rb65u56rv
You can verify the secrets by listing them using the below command:
$ vault kv list secret
Keys
----
login
2. Using the Vault UI
List service in vault namespace to get the EXTERNAL-IP of the LoadBalancer.
$ kubectl get svc -n vault
NAME                       TYPE           CLUSTER-IP       EXTERNAL-IP    PORT(S)             AGE
vault                      ClusterIP      10.245.139.117   <none>         8200/TCP,8201/TCP   28h
vault-agent-injector-svc   ClusterIP      10.245.58.140    <none>         443/TCP             28h
vault-internal             ClusterIP      None             <none>         8200/TCP,8201/TCP   28h
vault-ui                   LoadBalancer   10.245.11.13     24.123.49.59   8200:32273/TCP      26h
Access the Vault UI using the above external IP of the loadbalancer.
Ex: <external-ip>:8200
In my case: 24.123.49.59:8200
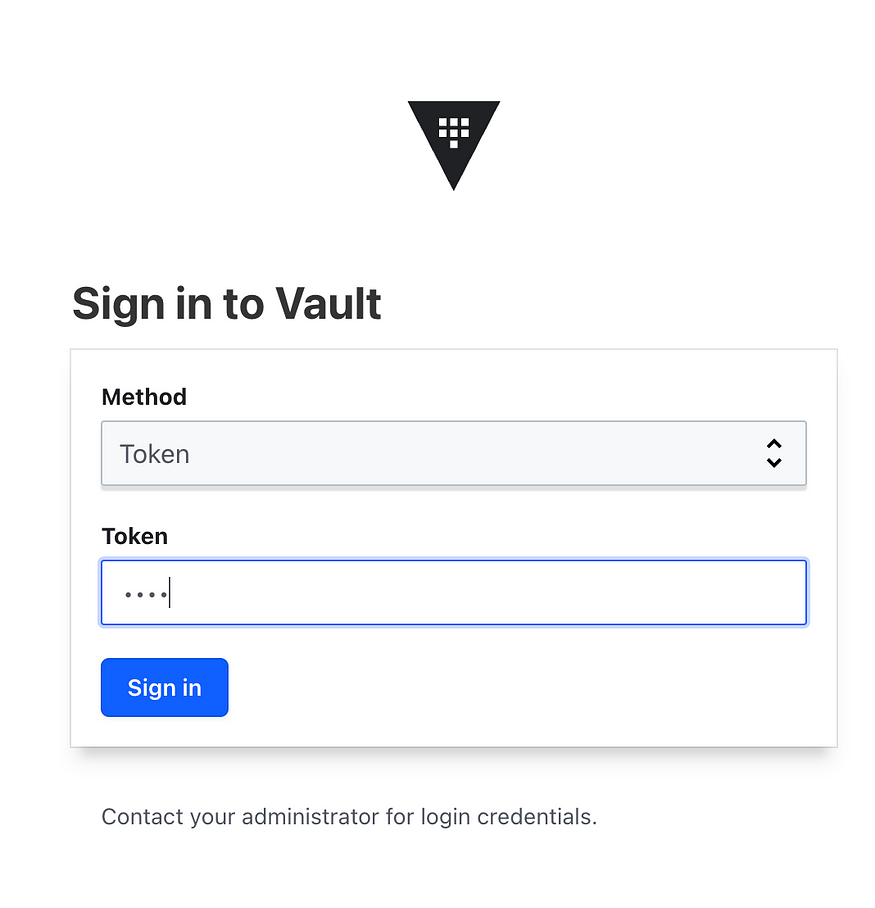
Now you can login to vault using the Token method, initially use Token= root to login.
Now using the Secrets Dashboard from Vault UI, we can create the secrets.
Navigate to Secrets Engines > Secret
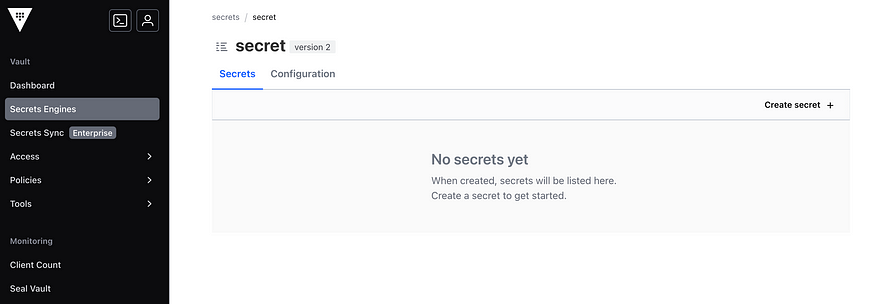
Then click on Create Secret from right top corner.
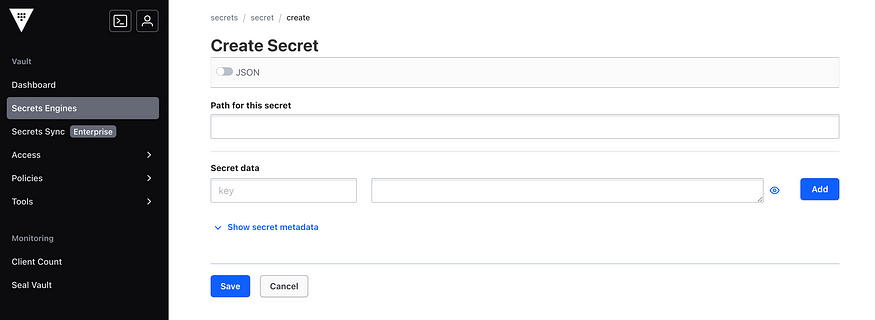
Now enter the desired fields for our secret to create our secret.
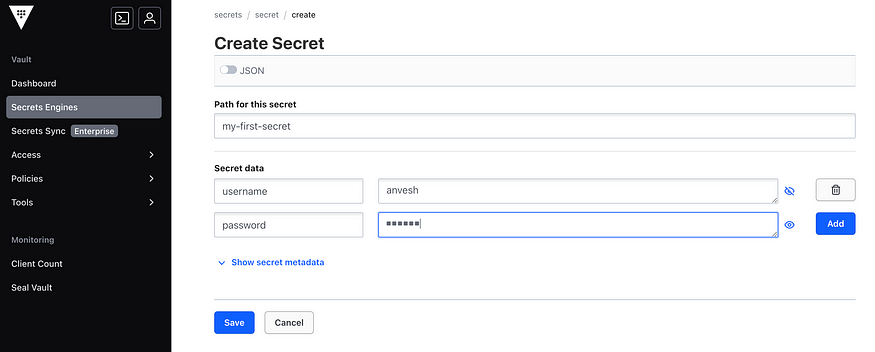
Finally secret is created.

Even you can access the above secrets from Vault CLI using the below command:
$ vault kv list secret
Keys
----
login
my-first-secret
You have successfully installed and configured Vault in your Kubernetes cluster. You can now use Vault to manage secrets for your applications running in Kubernetes.
Accessing Secrets in Kubernetes Pods
Using the above steps, we have installed Vault and configured a Vault role(vault-role) to allow the service account(vault-serviceaccount) to access secrets stored in Vault.
Additionally, we have created two secrets: login and my-first-secret with key-value pairs. Now, let's create a simple Kubernetes deployment and try to access those secrets.
First, let’s create a service account named vault-serviceaccount in the vault namespace. This service account is granted permissions for the Vault role as defined in the "Create a Role" step above.
Save the below manifest file as vault-sa.yaml
apiVersion: v1
kind: ServiceAccount
metadata:
  name: vault-serviceaccount
  labels:
    app: read-vault-secret
Apply the above manifest using the below command
kubectl apply -f vault-sa.yaml
Now, let’s create a simple deployment(vault-secret-test-deploy.yaml) using the manifest file below.
This deployment manifest creates a single replica of an Nginx pod configured to securely fetch secrets from Vault. The Vault Agent injects the secrets login and my-first-secret into the pod according to the specified templates. The secrets are stored in the pod's filesystem and can be accessed by the application running in the container. The vault-serviceaccount service account, which has the necessary permissions, is used to authenticate with Vault.
Let’s delve deeper into the annotations section to understand their purpose and functionality:
annotations:
        vault.hashicorp.com/agent-inject: "true"
        vault.hashicorp.com/agent-inject-status: "update"
        vault.hashicorp.com/agent-inject-secret-login: "secret/login"
        vault.hashicorp.com/agent-inject-template-login: |
          {{- with secret "secret/login" -}}
          pattoken={{ .Data.data.pattoken }}
          {{- end }}
        vault.hashicorp.com/agent-inject-secret-my-first-secret: "secret/my-first-secret"
        vault.hashicorp.com/agent-inject-template-my-first-secret: |
          {{- with secret "secret/my-first-secret" -}}
          username={{ .Data.data.username }}
          password={{ .Data.data.password }}
          {{- end }}
        vault.hashicorp.com/role: "vault-role"
These annotations are used to configure the Vault Agent to inject secrets into the pod volume.
- vault.hashicorp.com/agent-inject: “true”: Enables Vault Agent injection for this pod.
- vault.hashicorp.com/agent-inject-status: “update”: Ensures the status of secret injection is updated.
- vault.hashicorp.com/agent-inject-secret-login: “secret/login”: Specifies that the secret stored at secret/login in Vault should be injected.
- vault.hashicorp.com/agent-inject-template-login: Defines the template for the injected login secret, specifying the format in which the secret will be written.
- vault.hashicorp.com/agent-inject-secret-my-first-secret: “secret/my-first-secret”: Specifies that the secret stored at secret/my-first-secret in Vault should be injected.
- vault.hashicorp.com/agent-inject-template-my-first-secret: Defines the template for the injected my-first-secret, specifying the format in which the secret will be written.
- vault.hashicorp.com/role: “vault-role”: Specifies the Vault role to be used for authentication.
serviceAccountName: Uses the service account vault-serviceaccount which has permissions to access Vault.
Apply the above manifest using the below command:
kubectl apply -f vault-secret-test-deploy.yaml
Use the below command to check the vault secrets from the pod volume
$ kubectl exec -it vault-test-84d9dc9986-gcxfv -- sh -c "cat /vault/secrets/login && cat /vault/secrets/my-first-secret" -n vault
$ kubectl exec -it vault-test-84d9dc9986-gcxfv -- sh -c "cat /vault/secrets/login && cat /vault/secrets/my-first-secret" -n vault

Defaulted container "nginx" out of: nginx, vault-agent, vault-agent-init (init)
pattoken=ytbuytbytbf765rb65u56rv
username=anvesh
password=anveshpassword
That’s it! We have successfully created secrets in Vault and utilized them within our pod.
Source Code
You’re invited to explore our GitHub repository, which houses a comprehensive collection of source code for Kubernetes.
GitHub - anveshmuppeda/kubernetes: Kuberntes Complete Notes
Kuberntes Complete Notes. Contribute to anveshmuppeda/kubernetes development by creating an account on GitHub.
Also, if we welcome your feedback and suggestions! If you encounter any issues or have ideas for improvements, please open an issue on our GitHub repository. 🚀